Watch Video:
|
3DStudents.com is a resource for digital 3d content production students, whether it be for entertainment, fine art, industrial, medical or any industry. If you have any questions or suggestions, feel free to contact me. cornell " at " 3DStudents.com ~Cornell |
| About My High School Program, Digital-Evolutions. | [ − ] |
Digital-Evolutions, is a public high school digital arts program, introducing students to digital sculpture, design principles, traditional art mediums, programming, visual storytelling, engineering/medical visualization, video production, and a heavy focus on 3D visualization and animation. Students can participate up to four years, with two possible advanced college accredited tracks, both IB and traditional. Our core philosophy, is to move past just teaching the tool, to empowering students to become intrinsically motivated, independent learners, story tellers, and artists. It challenges them to tap into both hemispheres and further develop their logical and creative abilities as an artist and critical thinker. The program is both exciting and challenging, providing students with a learning environment without limitations and opening the the door to artistic expression and conceptual exploration. Students become artists, visual story tellers, and technical problem solvers, further preparing them for the ever-changing digital landscape and future workforce.
Digital-Evolutions is hosted at Smoky Hill High School part of the Cherry Creek School District.
Occupational Outlook Handbook 2008/09 predicts that digital media design and animation will show tremendous growth ‘much faster than average’ through 2016 nationally. As of 2008, China has over 30 animation industrial bases, 5,400 animation companies, 450 high schools teaching certified animation courses, and 460,000 students studying animation related subjects. This was an increase of over 36% in comparison to 2006. (Aldric Chang 2008) According to Robi Roncarelli industry expert, China’s growth is not even due to outsourcing, but huge local demands. So it can be said that, our local industry is just at its infancy and this perpetual growth is blending together multiple disciplines, blurring the line between art, science, math, and technology.
But our underling goal is to develop intrinsically motivated creative learners with the skills to succeed in their chosen career path; whether it be engineering and the sciences or entertainment and the arts.
| About Me . . . | [ − ] |
Creativity and design has always been a huge part of my life, it has been infused in the way I think, live, parent, and teach, so it is difficult to separate it from my studio classroom. I am a 3d designer and sculptor, my entire family comes from some type design and/or art background. My father was head designer at Kodak and used cutting edge design equipment since the 70's, which lead me to receiving my first computer in 1982. My brother is in a think tank and has been using 3d printers for close to 25 years. A “learning space” is more than just physical, it is a way of thinking, it is a process, it is an atmosphere, it is what I call a “Creative Epicenter”.
In the classroom, I have sixteen years experience working with k-12 and post-secondary students; eleven of those years my emphasis has been teaching creative work flows, the design process, 3d design, and visualization. Additionally, I spent two years as District Technology Coordinator and curriculum trainer for Red Creek Public School District, NY. Personally, I have eight years of Industry related experience – founder and head artist at Specular Studios LLC (http://specularstudios.com/).
Over the last 12 years, I have developed two design program models, a new high school model, Digital-Evolutions (http://www.digital-evolutions.org/) and a middle school version TEAM-C in Denver Public schools.
Digital-Evolutions is a public high school digital 3D design studio housed in Smoky Hill High School outside of Denver Colorado. Our core philosophy, is to move past just “teaching the tools” to empowering students to become creative, intrinsically motivated, independent, conceptual learners with a solid understanding of the creative and design process. Students can participate up to four years, with two possible advanced college accredited tracks, both IB and traditional. The curriculum challenges students to tap into both hemispheres of the brain to further develop their logical and creative abilities as both an artist and critical thinker. The program is both exciting and challenging, providing students with a learning environment without limitations and opening the the door to artistic expression and conceptual exploration. Students become innovators and problem solvers, further preparing them for the ever-changing digital landscape and future workforce.
Presently, I am teaching: 3D Design and Animation, Advanced 3D Design Animation, Digital Portfolio I and II, computer graphics, MYP Design Technology, and IB Digital Arts. The backbone of the classes are to guide them through the design process while they create an original product. During this process, I emphasis that 70% of out effort is developing the idea and once that is set, we build it.
The studio is set in three main areas:
“The Tank” - a collaborative space and think tank, which also houses the recording studio and currently the 3d printers and 3d scanner.
The concept studio - which is our HP workstation lab (sponsor) fully equipped with hardware and software
The prototype studio – which is the hands on area, for creating maquettes,
| Have a Question or a Great Tip? . . . Please Contact Me. | [ − ] |
‘Simple’ Bump Mapping
Make 3 Primitive Spheres.
Create a Polygon Plane for the ground.

Add a Physical Sky Arnold Light.

Assign a unique Arnold Standard Surface Material to each object in the scene. Render a test scene.

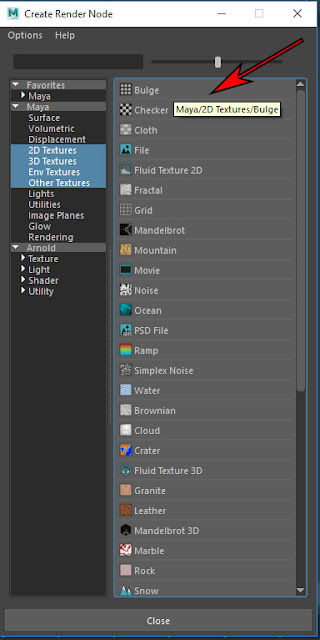
On the first sphere, assign a Bulge Procedural Texture. Select the checkerboard next to the color attribute. A new window will pop up and choose Bulge


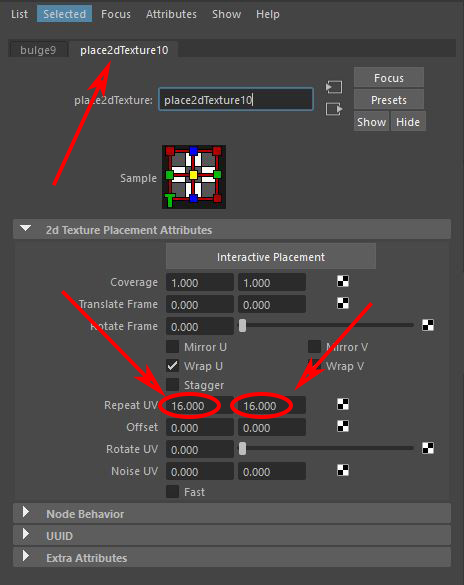
Change the Repeat UV under the place2DTexture from 4 to 16 in both the U an V directions.

It should look like this.

On the second sphere, assign a Bulge Procedural Texture to the Bump Map this time. Select the checkerboard next to the Bump Mapping attribute.

A new window will pop up and choose Bulge.

The bump map should look like this.

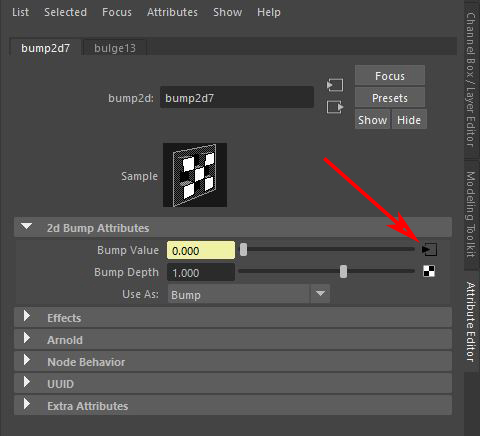
The bump attribute will show in the Attribute Editor. Select the input arrow next to the Bump Value and the place2DTexture attributes will show.

Now change the Repeat UV under the place2DTexture from 4 to 16 in both the U an V directions.

And bump map should look like this now.

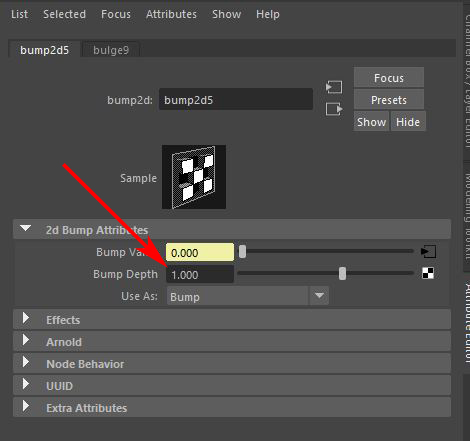
If you want to change the Bump Depth, {Right Click} on the words “Bump Mapping” a sub menu will show up and choose ‘bump2d.outNormal’ and the bump attributes will show.

If you want to change the depth of the Bump Map, change the Bump Depth, – “1” is default, larger is more Bump Depth and smaller is less Bump Depth such as 0.25

Now for the last sphere, assign both the bump and the texture.
A new window will pop up and choose Bulge.
Change "Scale" to 0.25.
TEXT
Create type
Choose font
Mesh Display - Harden Edges
Increase Curve Resolution –8?
Enable Bevel
adjust bevel
Bevel Distance?
Increase Extrude divisions - 8?
Extrude Distance 10?
Make Deformable
Separate Text
Center Pivot Each Letter
Move around
Combine text
Make Cube to subtract backside
8cm X 2.5cm X 1cm
Playing with nCloth
Dynamics Reel 1
Dynamics Reel 2
Cloth Dance Simulation
Cloth Fx Reel
Create a Cube for a table top. Then create 3 objects to sit on the table. Bevel all appropriate edges.
Create a Polygon Plane with a dense level of Divisions. Position it slightly over the top of the highest object.
Create > Polygon > Plane
With the Polygon Plane still selected change the subdivision Width & Height to something like 60 X 60.
Assign a new aiStandardSurface material. Right-Click & Assign New Material
Choose aiStandardSurface.
Find a tillable, table cloth image. It should be square in resolution and at least a medium resolution. Save it to your computer.
Next to the color attribute, select the checkerboard icon.
A new Create Render Node window opens up, choose file.
The attribute window changes. Select the File Folder next to Image Name.
Choose your table cloth image and Open.
Your plane should change color to the image you just selected. If it does not, press < 6 > on the keyboard.
Change the Maya Menu Set, choose FX.
Select the table cloth object and then choose nCloth > Create nCloth.
Select the table and the objects and now choose nCloth > Create Passive Collider.
In the timeline, set the end range time of the playback range to 5000.
Press Play in the in the playback controls.
Add a Image Based light. Choose Arnold > Lights > Skydome Light.
Next to the color attribute, select the checkerboard icon.
A new Create Render Node window opens up, choose file.
Choose your HDR image to light the scene and Open.
Select the aiSkyDome and change the format to Angular.
Now render the scene. Arnold > Render
This image looks a little blown out. Change the aiStandardSurface Intensity.
We are Done!!!


